Drawing realistic portraits with Paper
Portraiture is at the heart of what I use Paper by FiftyThree to create with. After drawing over 700 faces some might think it would be easy for me to share my process and techniques — they would be wrong. After struggling writing this guide for the last month, I think I finally shaped it in a way that makes sense.
Like the other parts of my Mastering Paper tutorials, this guide will explain my techniques and how I use them. My drawing style has evolved from the abstract to the more realistic since starting the PaperFaces portrait project almost 2 years ago. It only seems fitting to organize the guide in a way that mimics this same evolution.

What this guide won’t be is a lesson in human anatomy. You’d be better served reading a book on the matter instead of me paraphrasing it for you. What I will do is explain the basics of drawing a face with Paper and how to get the most out of the app.
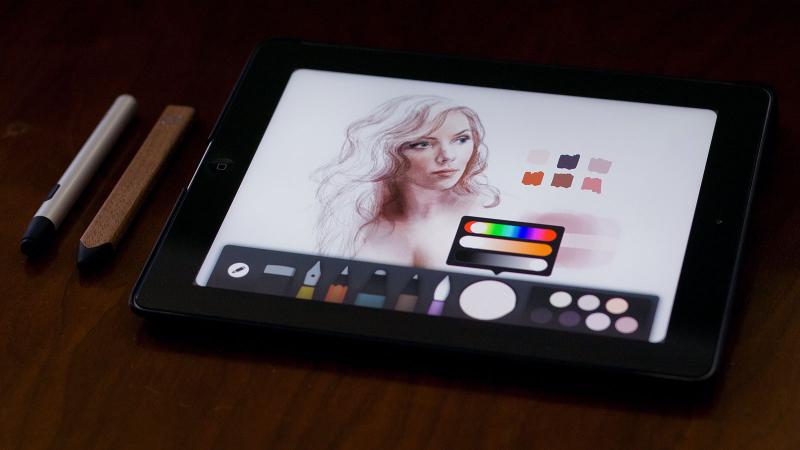
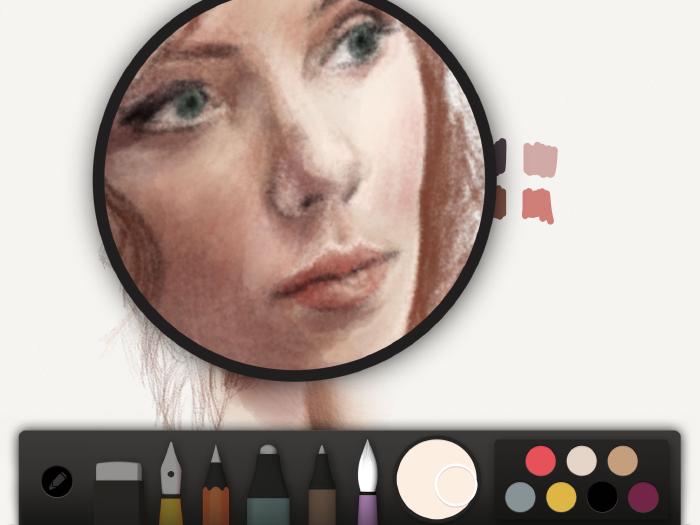
Color palettes for skin
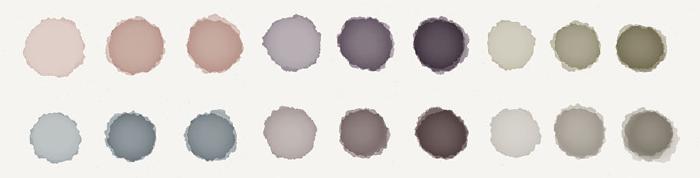
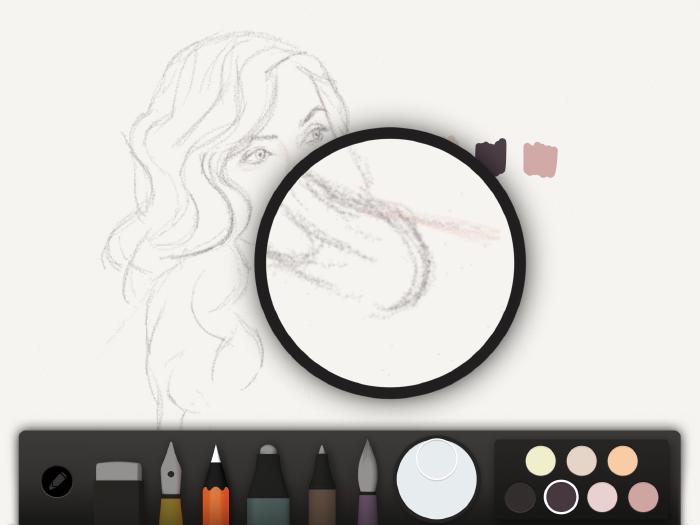
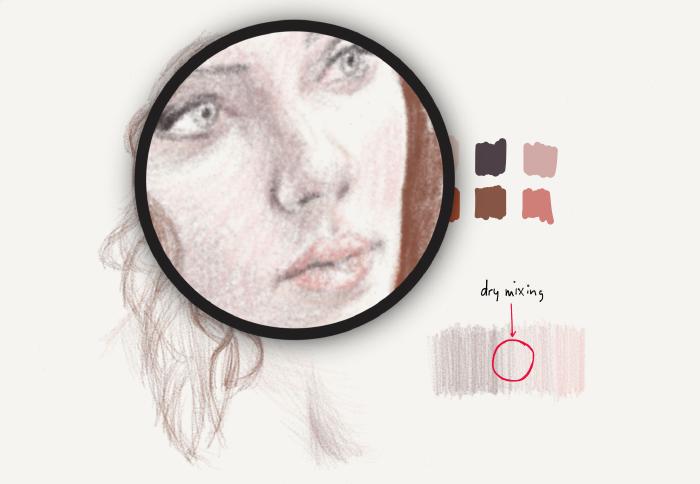
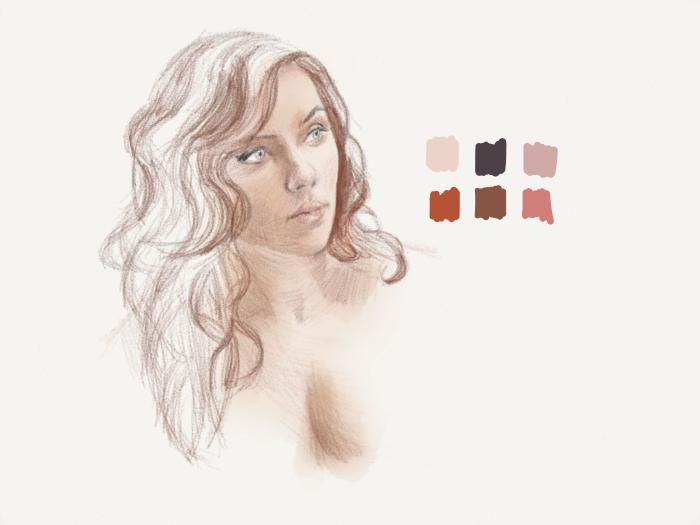
Before getting into any specific technique, I’d like to share my favorite palette. With this set of seven custom mixes I can pretty much reproduce any skin tone I want. Below I’ve painted a color wheel with each to show how they appear when layered, darkened, and lightened. Tapping the circles below will open into larger views allowing you to save1 a copy to use as reference.
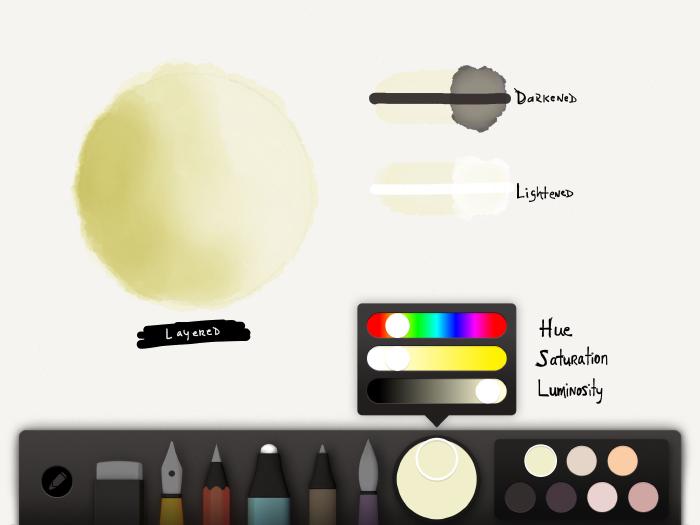
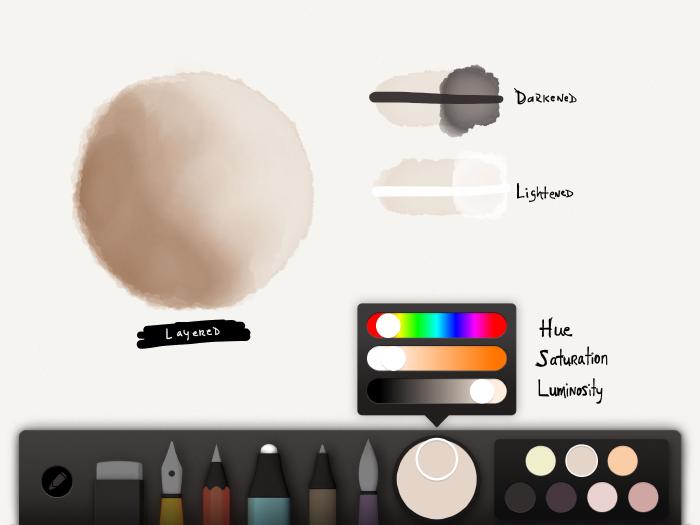
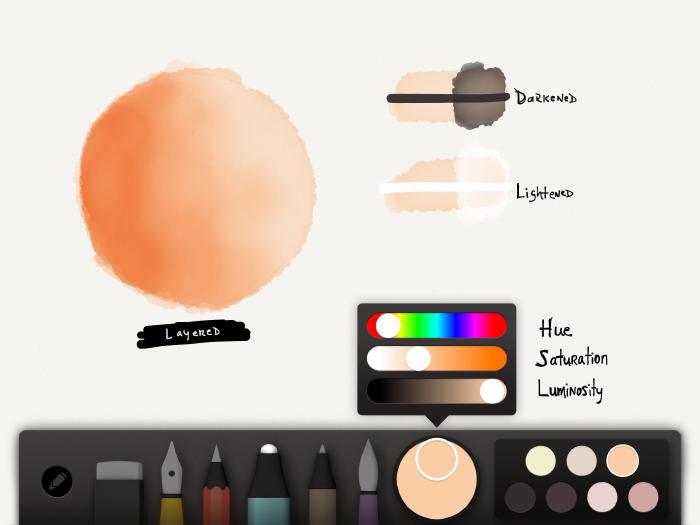
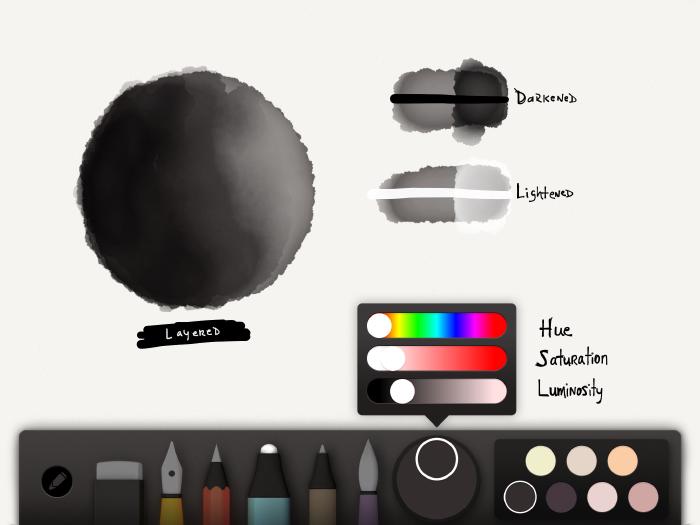
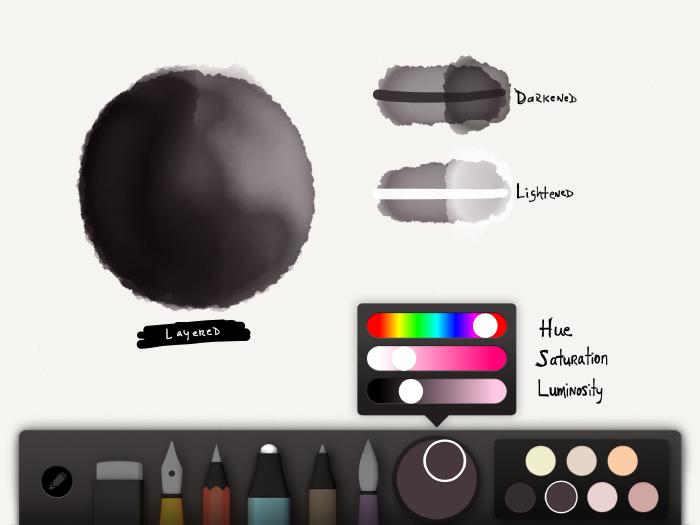

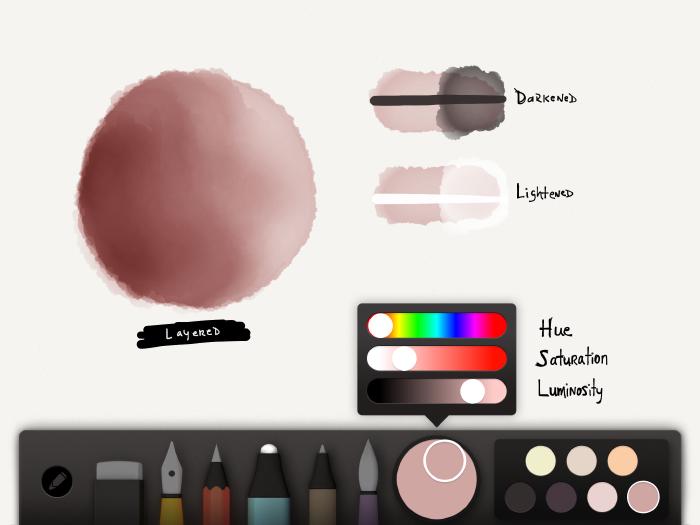
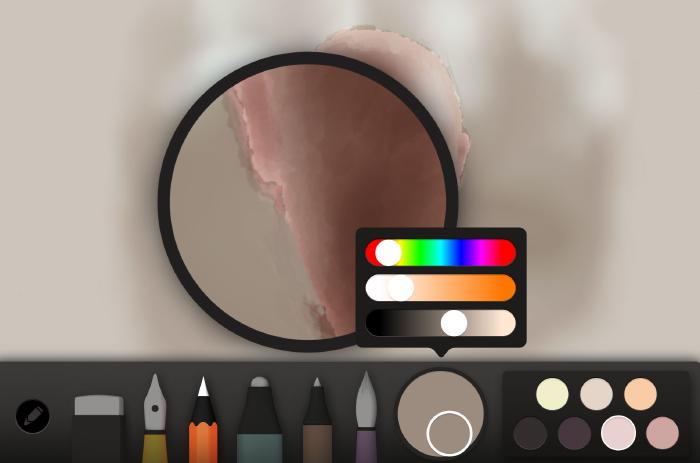
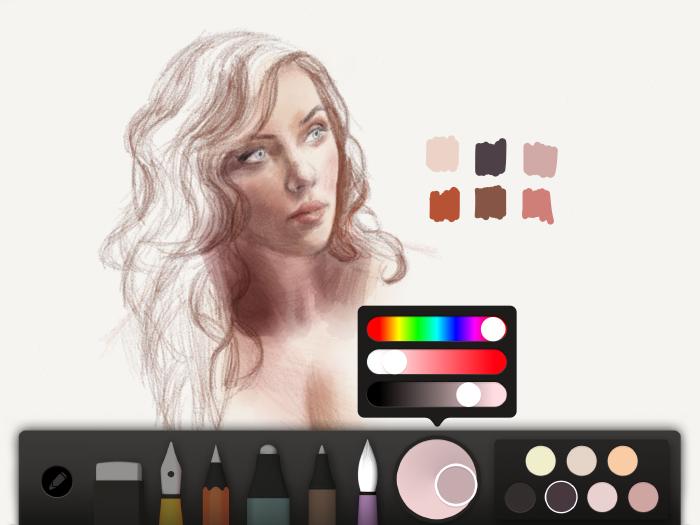
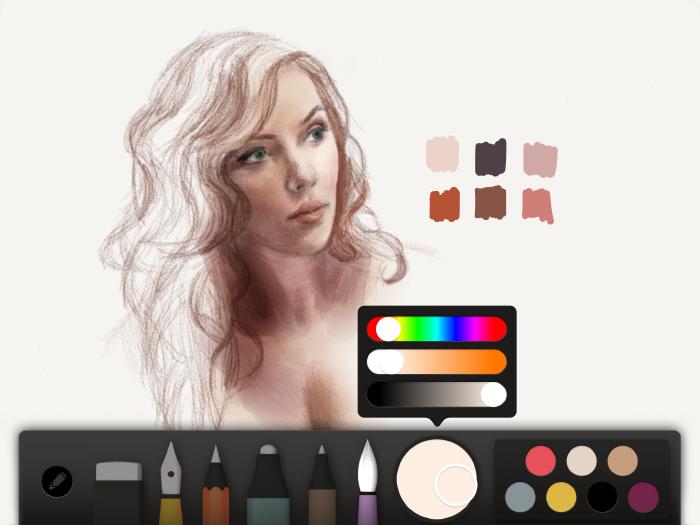
Paper by 53 currently doesn’t have a way of exporting or sharing color palettes. To recreate these on your iPad you will need to follow these steps:
- Buy the Color Mixer tool if you haven’t already.
- Tap the small circle within the Color Mixer and move the 3 sliders to match the color you are looking to copy.
- Tap the small circle again and drag it into a vacant spot in your palette to the right.
- Repeat the process for each color you wish to copy and use.
Choosing colors
In my previous guide I went over a few color theory basics that can help guide you to make more informed color selections. Building on top of those guidelines here are a few more that are specific to painting portraits.
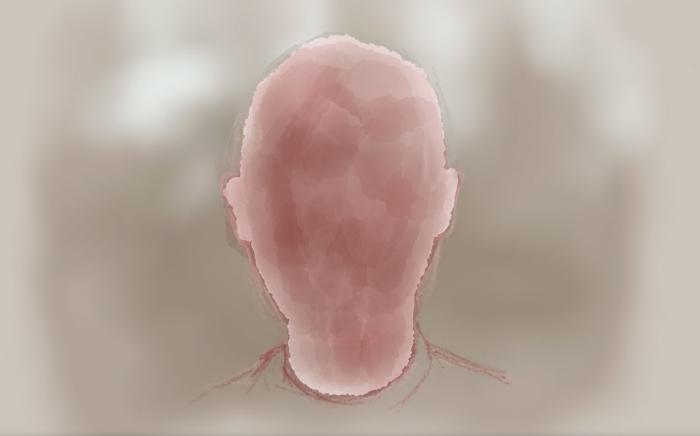
When I’m having trouble getting a mix just right I focus more on whether it is warm or cool and adjust accordingly. With regards to the face, you can roughly divide it into three sections. Lighting has an important role in this and variations will occur, but for the most part you can divide a face with fair complexion like so.
Forehead
Your forehead is free of surface capillaries and muscles leaving it white or a golden yellow. Along the hairline you’ll notice a darker tone that I like to use as a way of blending hair follicles into the scalp. But I’m getting ahead of myself, more on painting hair in a future guide.
Golden yellows and oranges are frequently used to glaze the forehead.
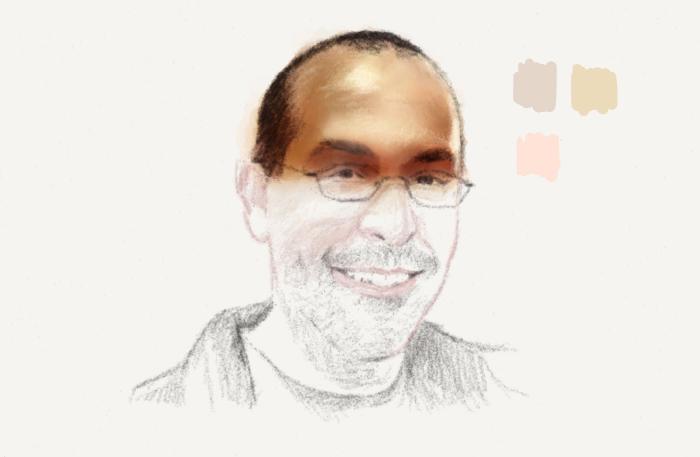
Mid-face (cheeks/ears/nose)
Traveling down the face just below the eyes and above the mouth is an area comprised of capillaries filled with blood. All this blood causes the ears, nose, and cheeks to turn a reddish color. A simple thing like glazing cheeks with warm mixes of orange and red can liven a face up, especially in females.
Chin
The third section of the face with a noticeable color tone is the area below the nose to the chin. In men this section tends to be a blue, green, or even gray in color. Depending on the amount of facial hair present this color will be more pronounced.
If you remember back to my previous guide, green and red are complementary colors. One way of accentuating a color is by surrounding it with its complement. I use this trick often when painting female faces, when I want to call out their lips by painting the shadows with glazes of blue or green.
Painting skin
To some, the watercolor brush is magical while others find it extremely confusing and frustrating — I completely understand that. To master the brush you have to be mindful of a few things:
Speed controls opacity
The brush produces a range of values by varying the speed at which they’re painted. If you move your finger (or stylus) slowly across the iPad’s screen, the mark will darken — moving fast, the mark will fade into the canvas and appear lighter.
Speed is the single most important variable for creating smooth tones or glazes. The second is never lifting the tip off the screen until you’ve filled a shape.
New to Paper or drawing in general? Make your life easier and work large, filling up the entire page. The smaller the composition the harder all this becomes since the brush has a fixed size. Well that’s not completely true, but for those of you who don’t use Bluetooth stylus like FiftyThree’s Pencil or a Pogo Connect — it is.
Whites to erase
A cheat I used in my early Paper portraits was to omit facial features by not drawing them. I’d spend my time adding detail to the background elements instead of a person’s face just because they were easier for me.
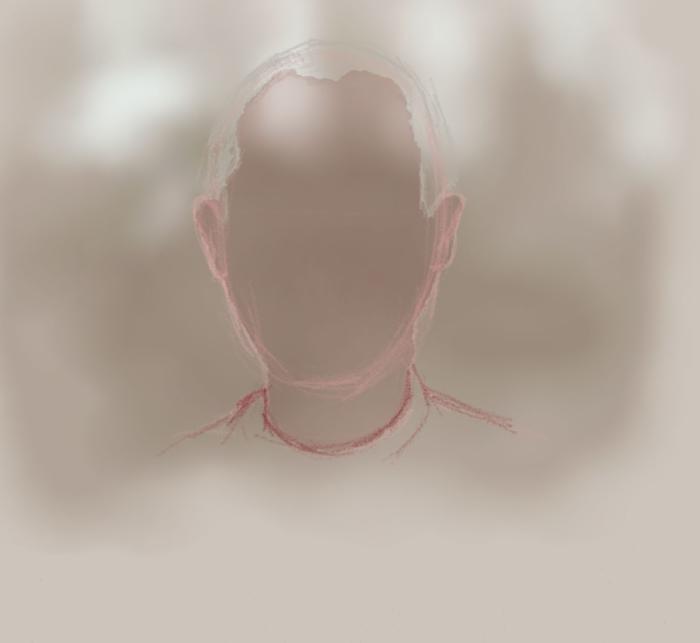
To paint in this style, start by lightly sketching out the figure to act as your guide. To simplify things I’m going to pull a face out of a bland background. I’ve found that it is much easier to drop in a background first, because you don’t have to be as precise. It also helps reduce hard edges or gaps in color that may appear around the face’s edge.
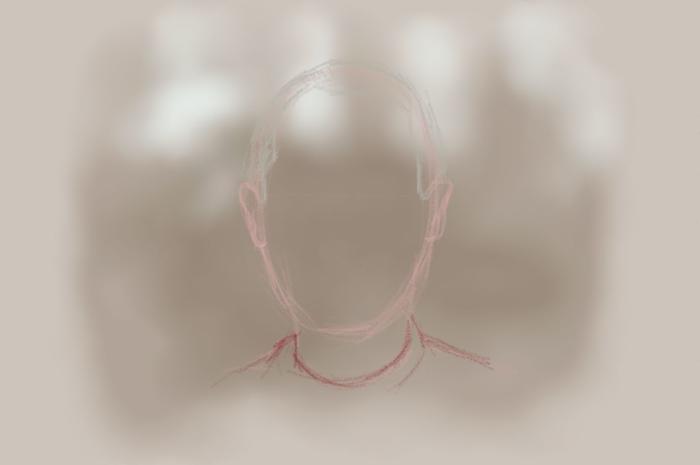
With your background dropped in, select the pencil tool, a light color, and sketch out the general outline of the figure. Drawing sensitive lines will convey more meaning in your drawing and guide how you paint. For example, I place heavier lines in my sketches to show shadows or areas I will want to darken with watercolor later.
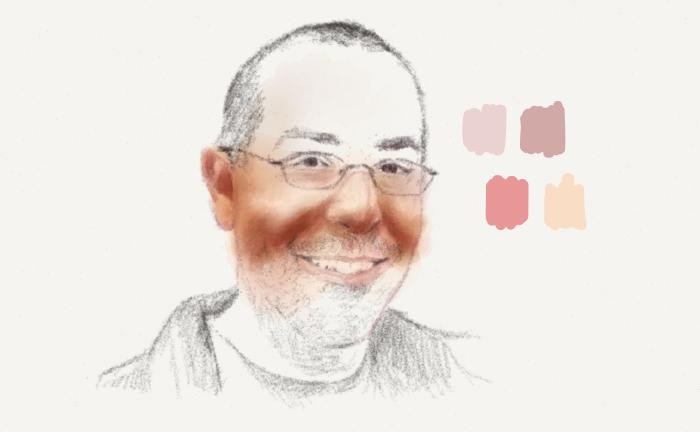
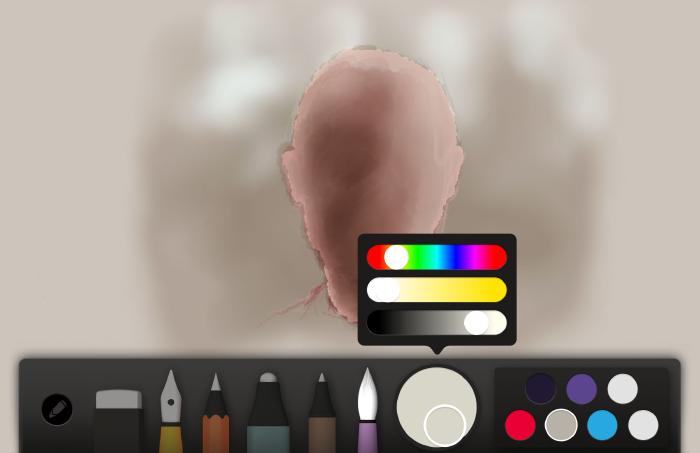
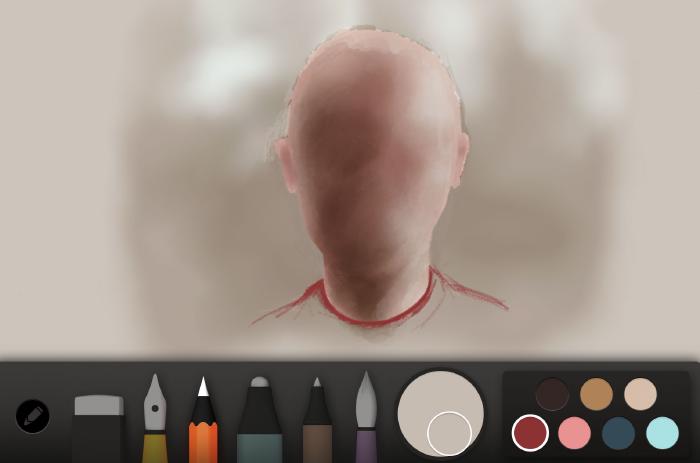
With a rough sketch complete, it is time to put those skin tone palettes from before to work. For this example I’m going to choose the light red mix to start with. If you were to paint with this in its current state it wouldn’t be effective at pulling the face out of the background. What we need to do is mix white into it to make it opaque2 and act like an eraser.
If you add just the right amount of white to a color it will allow you to lighten anything you paint over. This is how I pull a face out of the background.
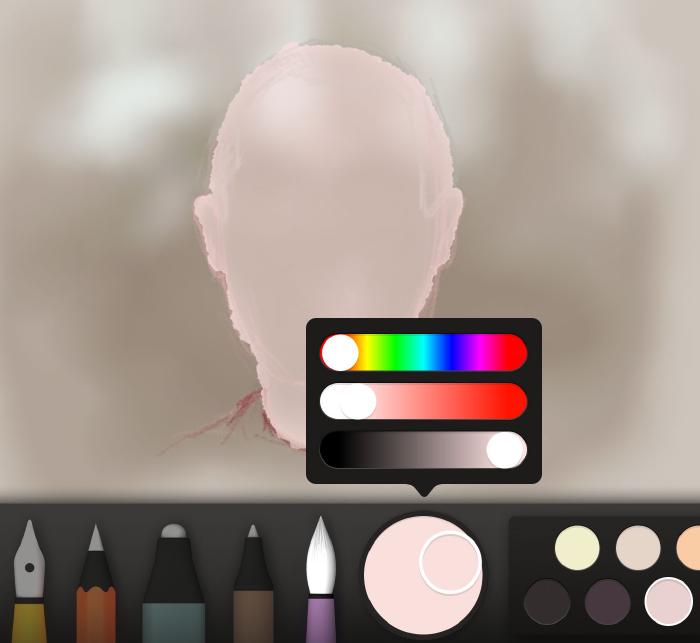
Of course you could just use the eraser tool to remove the background, but it will produce a harsher edge — which I like to avoid. Used as a lightener, the brush gives greater control over the amount of background you remove.
Building the face with glazes
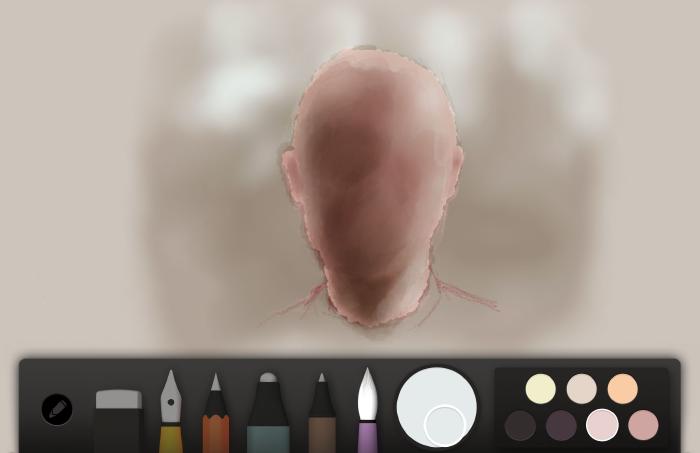
With the face’s shape pulled out from the background, we can start the process of rebuilding it. Referencing my custom skin tone colors, choose the light red again and apply an even glaze over the entire face. Don’t worry if you overlap into the background, we’ll fix that later.
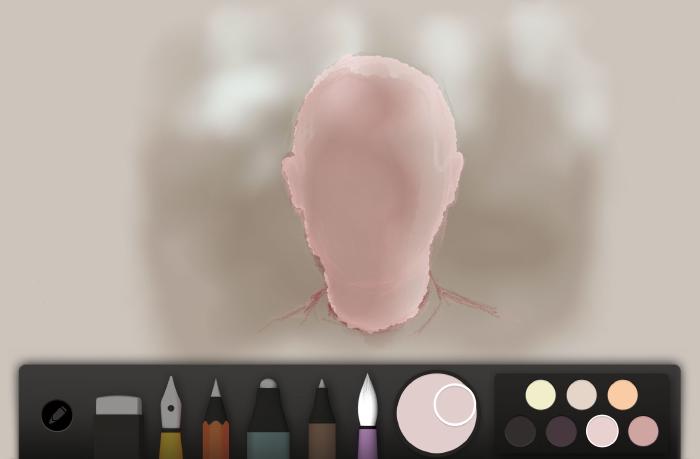
If you decide to use your own color mix I suggest one that is light — the less intense the color the better. Take your time to carefully observe the shapes you are painting. Drawing is as much of seeing as it is putting a mark on the canvas.
Don’t be afraid to Rewind a stroke and redo it. I’ve been known to repeat this action over 20 times until I feel a stroke captures the form’s essence. Be deliberate with your brush movements and try to convey more with less (if that makes any sort of sense).
With practice you’ll become more confident in the shapes you are painting. I would urge you to avoid brushing with small choppy strokes to keep the skin smooth — unless you intend for it to look textured.
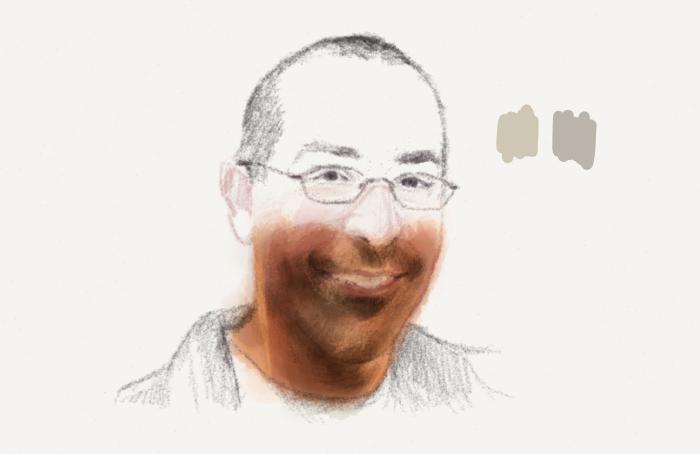
Adding shadows
A complimentary color works great as a shadow, especially when dialing down the lightness of your glazes. A heavy and more opaque color is harder to control because it will darken painted areas way too fast.
A variation of gray can also be effective for darkening areas. The important consideration here is to match the temperature of the gray to the area you want to darken. Tint your gray with reds and oranges for warmer tones, and blues and greens for cools.
To build up a realistic skin tone it may take numerous layers of varying colors. It’s not uncommon to mix in blue and green.
Cleanup and refinement
Depending on how accurate of a painter you are, your glazes may have bled outside of the face and into the background. To clean up these rough edges, use the pencil tool mixed with a color that matches the background. Then use it to cover up blotches or stray marks by drawing over them. Variations to the color may be necessary if your background is more complex than a single tone.
Don’t be afraid to use one of the ink pens for cleanup instead. For stylistic reasons I prefer the softness of a pencil, but either tool is acceptable.
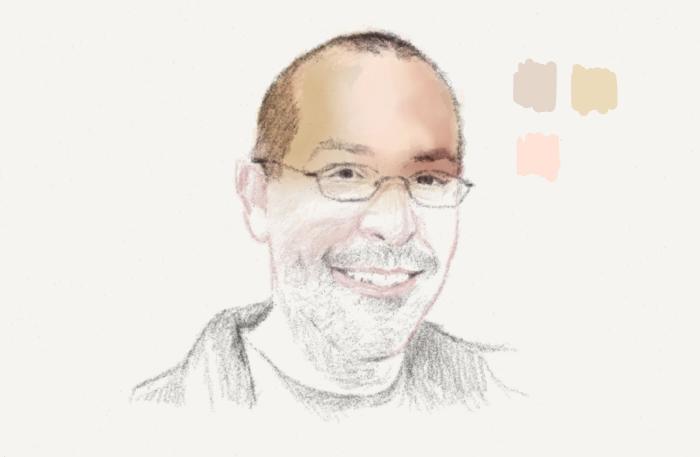
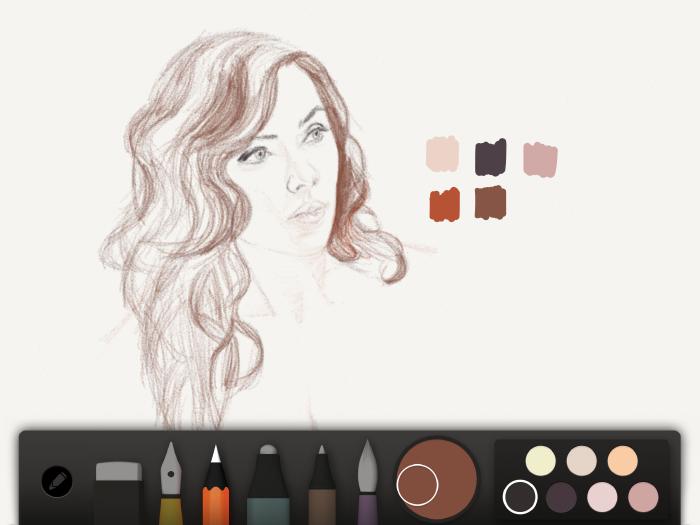
Creating realism with colored pencils
After almost two years of drawing and painting hundreds of blank faces, I had a break through when I started applying pencil strokes on top of my glazes. I found that this extra layer of texture added depth and complexity to the drawings which ultimately made them appear more realistic.
Like before we start with a loose sketch of the subject to rough out our composition. The pencil’s color doesn’t matter too much, just make it something light and easy to cover up.
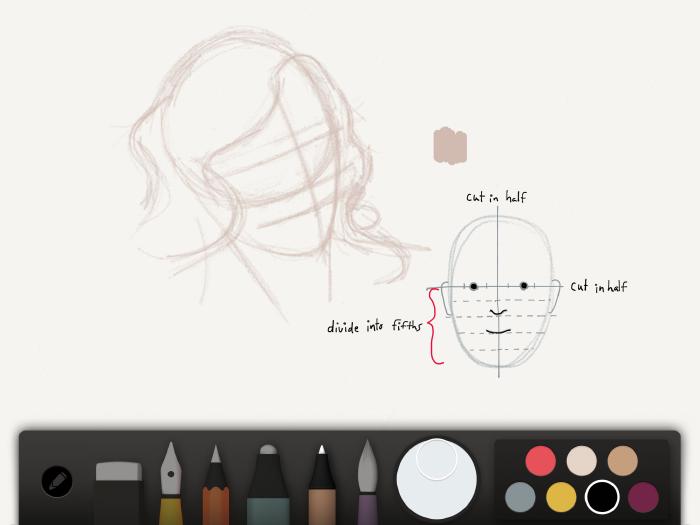
To really capture an accurate likeness the placement of the eyes, nose, and mouth are very important. The use of lightly sketched guidelines across the face can help with their placement. While not true 100% of the time the width of the eyes can be used to accurately measure the distance between each of the face’s features.
Generally Speaking:
- Pupils are placed just above the center line.
- An average face is approximately five eyes wide.
- The bottom of the ears align with the bottom of the nose.
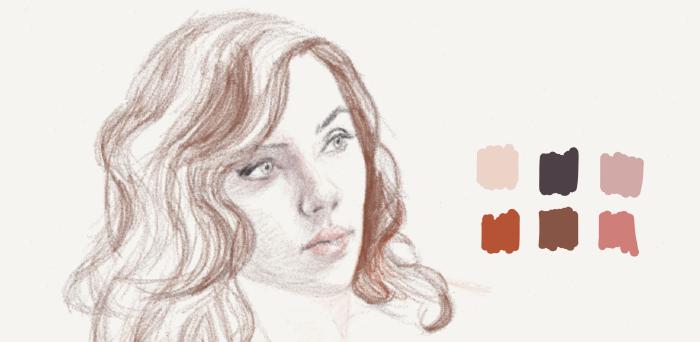
Refining the contours
Instead of switching to the brush, we’re going to stick with the pencil tool and begin refining the drawing. Color is going to play an important role in this step, if you’re not comfortable with that yet, I suggest working in black and white.
Bouncing between the eraser and pencil tools, remove stray lines from the initial sketch and sharpen up lines. Build up tones as you work and avoid using black. Refer to the face color guidelines from earlier to help make smart color choices.
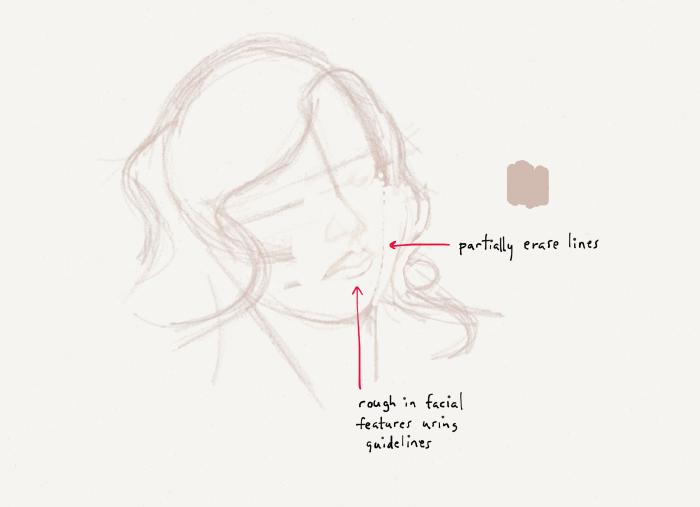
To remove the guidelines I either partially erase them or lighten the sketch by blending it with my finger.

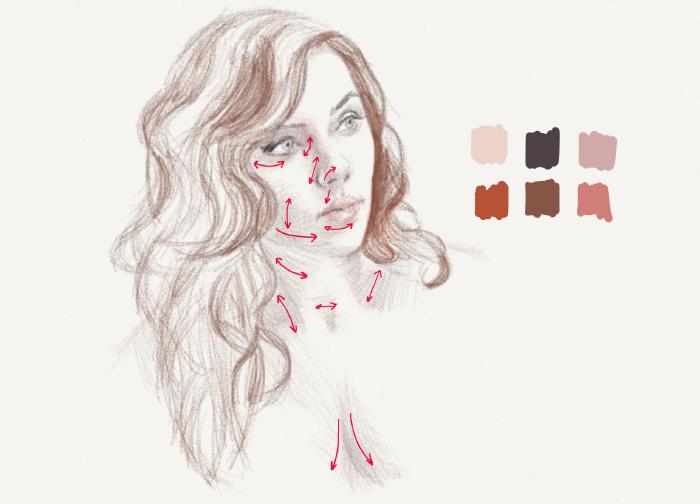
With the rough sketch cleaned up you want to begin darkening some contour lines. Start with the eyes first and focus your efforts on getting their shape as accurate as possible. A detailed eye will help draw the viewer in and can take emphasis off of the other features if you happen to screw them up.
The basic idea here is to sketch in all the dark spots around the eyes, nose, and mouth. If you’re using my skin color palette from earlier you’ll want to select one of the darks in the second row.
The areas you’ll want to focus on first are the pupils, upper eyelids, nostrils, and the crevices found around the lips.
Shaping skin with hatching
Once you’ve finished darkening and refining contour lines you’ll want to begin shaping the skin. The primary way to do this is with hatching techniques and dry mixing colored pencils on the canvas.
The idea is to build up tones from light to dark by overlapping pencil strokes and varying the distance between them. The amount of lines and the distance between them both effect how dark the tone will appear. I like to work from dark to light and use a combination of contour and cross-contour hatching to build up tones.
I’ve said this before in my Back to Basics guide, but it’s worth repeating. Be mindful of the direction of the strokes you are making when hatching to enhance the form. Observe how the skin bends and curves, and make pencil strokes that follow those same paths.
Don’t feel the need to shade all surfaces! Focus your attention on the darkest values and build up those gradations first. Keep in mind that we will be covering these pencil strokes with watercolor so don’t go too dark. I suggest making your tones about 50% lighter than how they appear — you can always darken things up later.

To make the face appear more real you’ll want to use a wide range of colors. By applying washes of color pencil on top of each other, you can build up the skin in a more believable way. Don’t be afraid to dry mix blues and greens into pale oranges and tans.
Continue hatching and coloring your way through the rest of the drawing. At this point you could call this a finished piece, but I’m going to take it a few steps further if you don’t mind.
Building the face with glazes, again
By applying a thin layer or glaze of watercolor on top, this colored pencil drawing will take on new properties. The colors will intensify with each layer of glaze, and pull everything together.

Try to get your glaze color as close to white without it actually lightening the pencil strokes beneath. This will allow you to paint more layers without going too dark and ultimately produce better results.
A few well placed brush strokes will go a long way in achieving a realistic look. The steps for applying these glazes are almost identical to before. You won’t be erasing the face here so you can forgo that step unless you’re correcting mistakes or adding highlights.
Using the color zone basics from earlier, apply red glazes around the cheeks and greens around the neck or where shadows appear.

Many of the techniques used to erase a face from earlier also apply here. Variations of white can be used to apply highlights and lighten the skin. It can also be used to correct spots that you might have gotten too dark, but be careful not destroy the smooth tones.
With our glazes looking pretty good, now is the time to switch back to the pencil tool do some cleanup. I start by using black or another dark color to add contrast around the eyes or anywhere else that is looking flat.
Depending on the subject I’ll often apply a layer of contour hatching on top of the glazes. I tend to do this more with males who have facial hair, to roughen things up and add texture. This is also a good time to apply any finishing touches like catch lights in the pupils or gloss on the lips.
My plan for the next guide was to reboot a hair tutorial I wrote a year ago, expanding on it to show more hair styles and facial hair techniques. But after finishing this lengthly tutorial it became clear to me there is still a lot I have to say with regards to #MadeWithPaper portrait techniques.
So how about this? Let me know in the comments below what you want to see next: hair tutorials or more portrait goodness like how to draw realistic eyes, mouths, and more.
Made Mistakes is a participant in the Amazon Services LLC Associates Program, an affiliate advertising program designed to provide a means to earn fees when linking to Amazon.com and affiliated sites. For full details read the complete disclosure policy.
34 comments
Thank you so much for writing this Michael! This is awesome.
Thank you so much for taking the time to explain your amazing techniques. Look forward to the hair tutorial next.
Great guide! I’d love to see guides on realistic eyes, mouths and more, as you put it!
Definitely eyes, mouth, face next.
Did you seriously draw John Gruber and Dan Benjamin?
Excellent tutorial, as usual! So, are you preferring the Pogo over Pencil?
Like I said before you should definitively think about getting these tutorials on a Paper Book.
I believe that a tutorial explaining in more detail the facial features is more important than a hair one!
Thanks for the feedback Miguel. Looking at the responses so far, pretty sure I’ll be doing a tutorial on facial features next.
Amazing and helpful!! I have been looking forward to this for a long time and it was worth the wait!! I would really like to see more on realistic portraits please.
This is a really useful guide, I’m gonna definitely learn a lot. One thing I have to ask, how did you make such a perfectly shaped box for your portraits? I’ve been messing about trying to make a good box for a workspace, but I can’t get it to look centered or straight or nice at all.
Thanks! RE: the square box. I drew it by placing a ruler on the screen and using a stylus. It takes some trial an error to get the placement but after that you can use it as “template” over and over again by duplicating it.
How do you blend?
To blend you need to use 53’s Pencil stylus. When it’s connected to Paper you can use your finger to smudge and blur.
I love your shading technique! The way you use the water color brush is so beautiful. Thank you for sharing!
I vote for more hair technique …
You are. My inspiration I hope to be as amazing as you! A realistic eyes, mouth and more would be Awesome ! Your tutorials are great! Wish I could save them somewhere like on noteshelf or even in paper:) wishful thinking!
Thank you
Hi Michael, you have definitely encouraged me to go digital, and I am enjoying it immensely. I up have also caught the Sktchy bug thanks to you.
Still have a lot of problems producing smooth brush washes, and the only stylus that suits my hand is an Adonit JotPro, so I am not going to buy the Pencil just for the Blend. Hope that Paper introduces it for the rest of us. Meanwhile: practice, practice, practice!
Glad to hear you caught the Sktchy bug!
Becoming proficient with the watercolor brush definitely takes practice. From using different styli I’ve noticed they all pretty much make the same mark. The big difference has been when I use a Pogo Connect. I don’t know if it’s because it has a pressure sensitive tip, but it seems fill paint quicker than the other styli, which in turn makes for a smoother wash.
When I use Pencil or any other stylus I have to really slow down how quick I paint or else it gets blotchy. That’s the key to smoothness. Which can be hard sometimes because if you linger in an area too long might turn too dark. It really is a balancing act between speed, value, and the color you choose to paint with.
Michael I find most styluses have a fat tip making detail accuracy difficult. The new one for Paper, while nicely designed, is enormous. Can you recommend one that is finer?
Out of all the rubber tipped styli FiftyThree’s Pencil is easily the one with the smallest tip… but that’s not saying much. If you want something a little more accurate and precise I’d look into Adonit’s Jot Pro if you’re only using Paper. Other wise their more expensive pressure sensitive styli look quite nice, but they only work with Procreate and a few other apps.
Hey Michael just a quick question! How much did you get your pogo connect for and where can I get one ?
I got my Pogo Connect a few years ago from Amazon. It’s currently going for $55 which is about $20-30 cheaper than what I paid.
Ok well is it worth getting if I already have the pencil stylus made by 53 ? Because that is the only stylus I have at the moment
Pre-Paper version 2.0.0 I would have said yes it’s worth getting a Pogo Connect. But now with Surface Pressure and some enhancements made to the watercolor brush you can pretty much do everything the Pogo allowed you to do.
Not to mention the Pogo Connect is a big steaming pile of unreliability. When it works it works awesome. The other 95% of the time it constantly disconnects or stops registering touches and you have remove the battery to power cycle it. I’ve never had those sorts of issues with Pencil.
Ok that’s what I figured! I love this guide btw but I just can’t draw for my life. When you first started out drawing were you amazing or did you practice like crazy because I know you always remind us to practice.
I knew how to draw OK before I started but was no where near the level I ended up doing a Paper drawing every day for two years straight. If you look at my PaperFaces gallery and scroll all the way to the bottom you’ll see how very simply my early stuff was. Practice made all the difference.
Michael, you are an amazing artist. Your tutorials have been very helpful to me. Have you considered writing a book on mastering Paper 53. I for one would buy it in a heartbeat. Thanks again for your valuable advice. Barry
Thanks for the kind words Barry! To answer your question, yes I’ve thought about writing a book. I don’t know if a printed version will ever happen but I’d like to do some sort of eBook or at the very least a companion guide to go along with my Mastering Paper series.
I’m kind of partial to the web based incarnation of the series because it’s easier for me to update as Paper continues to involve. Not to mention I have a bunch of gaps that I need to fill in on using Paper that I don’t know if I’ll ever get to them to make publishing a book on the subject worth while. If there were only more hours in the day ;-)
This is really great info. Since your post, Paper by 53 includes the number values of the colors, in the Hal mode. Are you able to look back and post what those values are, so we can replicate the colors more precisely? Thank you so much for what you have already posted.
Check out my article about the Color Picker. At the very end I share a link to my skin tone palette on Mix that can be downloaded to Paper. Click it and hit remix and Paper will open it letting you sample the colors with the new Color Picker or look up the values.
Michael, thank you so much for sharing this excellent tutorial. I’ve always wanted to draw realistic faces but have failed miserably. This will certainly help point me in the right direction.