
Getting started with Paper
Paper by FiftyThree and me were BFFs from the start. Spread across my journals you’d find around 600 pages with creation times ranging from 30 minutes to 4 hours. A conservative estimate has me logged at around 500 hours of drawing and painting in this iOS app — which is kind of crazy when I think about it.
I’m not sure if that qualifies me as a good teacher or not, but I’m going to try and expand on my tips and techniques in the following guide.
In this first part you’ll learn about the benefits of a stylus, how the Paper app tools work, and basic gestures you’ll want to master.
The remaining parts will dig deeper into techniques I use when drawing, page management, advanced features, and how to record the iPad’s screen and make time-lapse videos of your work.
Is a stylus necessary?
Finger painting with Paper can yield some impressive results, but may feel unnatural if you’re used to drawing with pens and pencils. If you decide to go with a capacitive stylus be aware that it won’t match the precision of a traditional pen because of the fat and rubbery tip.
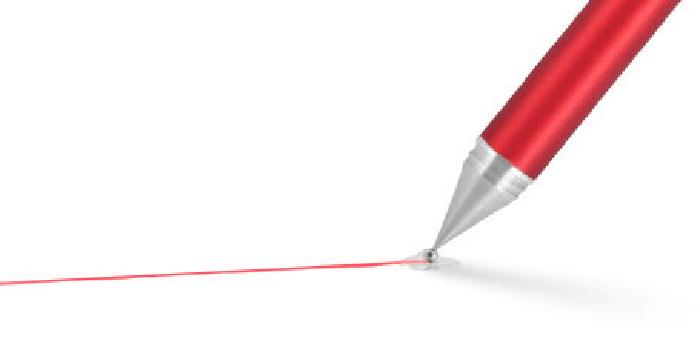
Going one step further are styli built with pressure sensitivity in the tip that can alter the characteristics of a mark depending on how hard you press on it. Paper by 53 supports Ten One Design’s Pogo Connect Smart Pen out of the box, and has become my go to stylus when creating on iPad. To learn more about how it became a favorite, check out my image filled Pogo Connect review.
The tools and how they behave

Starting with order of appearance you have the following tools at your disposal: eraser, fountain pen, pencil, marker, ink pen, watercolor brush, and color mixer. The fountain pen and eraser are included with the free app — the rest can be downloaded via in-app purchase as a set or individually.
When describing these tools I will be using the following descriptors:
- Speed: How does the speed of drawing affect a line’s weight.
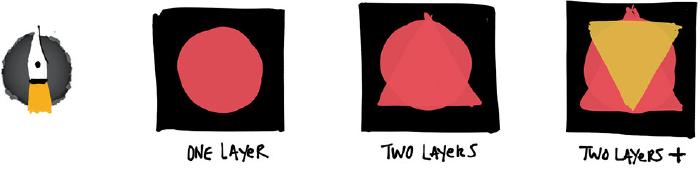
- Blending: Are marks opaque1 or translucent and how many layers are needed to make a pure color2.
- Sensitivity: How are marks and line quality affected by the amount of pressure applied when using a Pogo Connect Smart Pen.
Eraser
The eraser does what its name implies — it erases. It is not the most precise tool with such a fat tip, which is why I prefer to undo mistakes with the rewind tool instead (more on that later).
For handling cleanup duty, the eraser is very effective at defining edges and making them straight. By simply running it along an edge you can remove jaggies left by a pencil or watercolor stroke.

- Speed: Slow = thin. Fast = thick.
- Blending: Completely opaque. One stroke erases down to the egg shell white colored background.
- Sensitivity: Soft = thin. Hard = thick.
Fountain pen (Draw)
Along with the eraser, the fountain pen is included for free when you download Paper by FiftyThree from the App Store. This was the tool I originally used the most when experimenting with Paper a year ago. It’s hard not to fall in love with the flowing lines it makes when sliding your fingertips across the iPad’s glass screen.
My drawing style has evolved over the year from crisp line work to soft blended edges and tones. Because of this shift the fountain pen sees less usage and has been demoted to janitorial status like the eraser. Perfect for getting into tight places it also works well when coloring large blocks of color.
- Speed: Slow = thin. Fast = thick.
- Blending: Almost fully opaque. Depending on the color it can take 2–3 layers to create a purely opaque color.
- Sensitivity: Soft = thin. Hard = thick.
Pencil (Sketch)
Versatile and perfect in almost any situation — this is the one tool you should invest time in learning. The marks it makes resemble a traditional 2B pencil leaving behind a texture perfect for shading. The pencil also works great for lightly sketching to nail your composition before painting.
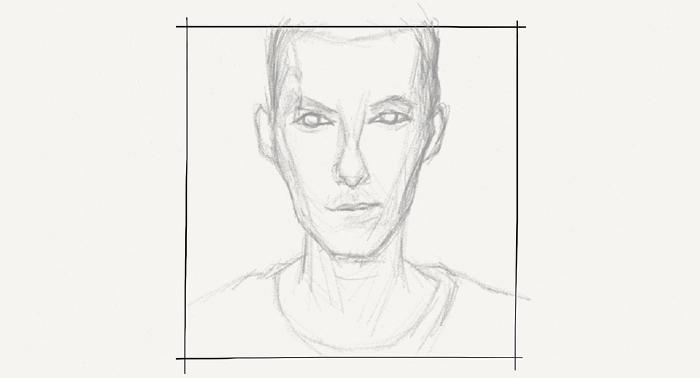
Shading power is amplified immensely when used with a fancy Bluetooth stylus with pressure sensitivity. If you’ve used a pencil in real life to draw you already know how to use this digital incarnation — making it one of the most precise and forgivable tools in Paper’s toolbox.
- Speed: Slow = dark. Fast = light.
- Blending: Semi-transparent — takes many layers to create a purely opaque color.
- Sensitivity: Soft = light. Hard = dark.
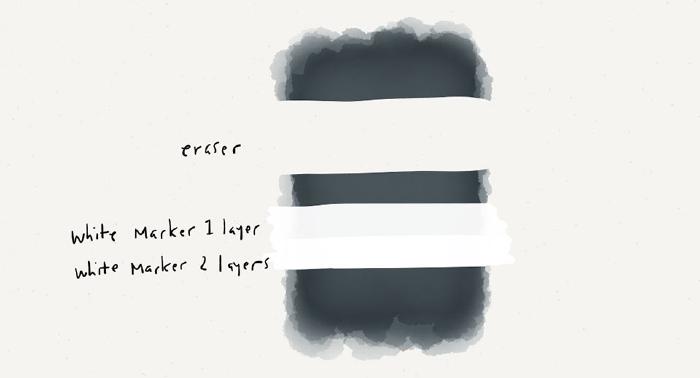
Marker (Outline)
Unlike the fountain pen, the marker makes transparent marks you can see through. To make sense of the marker I pretend it’s one of those neon yellow highlighters. If you drew yellow over black it wouldn’t show up, the same is true in Paper.
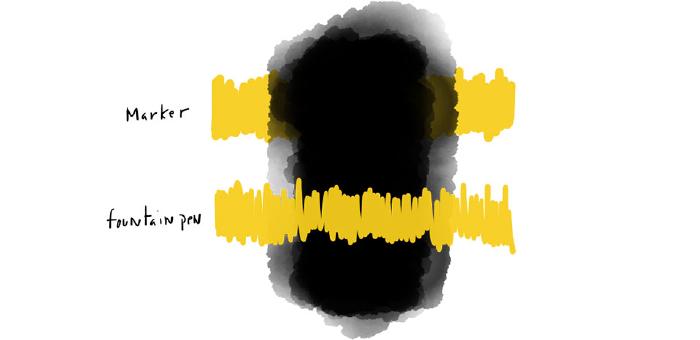
The exception to this rule is when the marker is filled with white. In this case it would act almost identically to the eraser but instead of an off-white color it makes a pure white.
When sharp shadows and values are desired in your illustrations, the marker tool is A+++. I tend to work more photo-realistic, but if you want that cartoon or comic book look the marker might be for you.
- Speed: Slow = thick. Fast = thin.
- Blending: Transparent, except white and black colors.
- Sensitivity: Soft = thin. Hard = thick.
Ink pen (Write)
Like the name implies the ink pen behaves like a roller-ball pen. If you look at the lines it creates you’ll notice heavier spots where a stop or start occurs. Uniform lines can be achieved by moving quickly throughout the entire stroke.

If you found the fountain pen’s thick/thins undesirable or hard to control the ink pen might be a better choice. The ink pen has less variation in line-width making it a perfect choice for writing or doing detail work.
Before I began using a Pogo Connect Smart Pen, I did all my lettering and writing with the fountain pen. I found the pressure sensitivity of that stylus difficult to control when crafting letter forms, so I switched to the ink pen3 instead.
- Speed: The difference is barely noticeable. Moving slower will make a slightly thicker line.
- Blending: Opaque.
- Sensitivity: The difference is barely noticeable. Pressing harder will make a slightly thicker line.
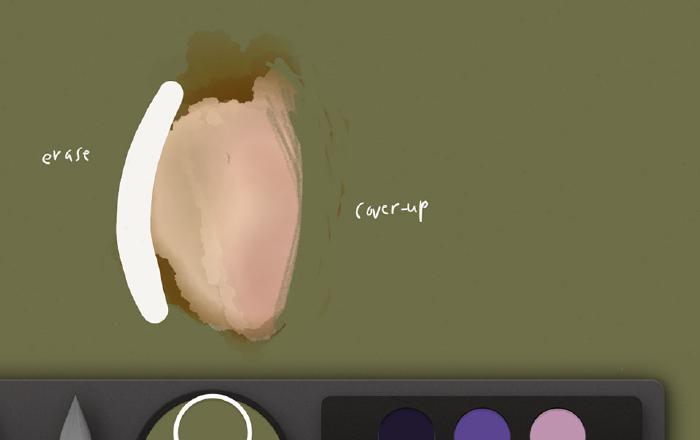
Watercolor brush (Color)
Like the pencil, the watercolor brush is another tool you should spend time experimenting with to learn all its nuances. This tool sets Paper apart from other apps by replicating the natural feel of pushing and pulling paint across a canvas. Without it I wouldn’t be able to shade, paint skies, or render hair realistically at all.
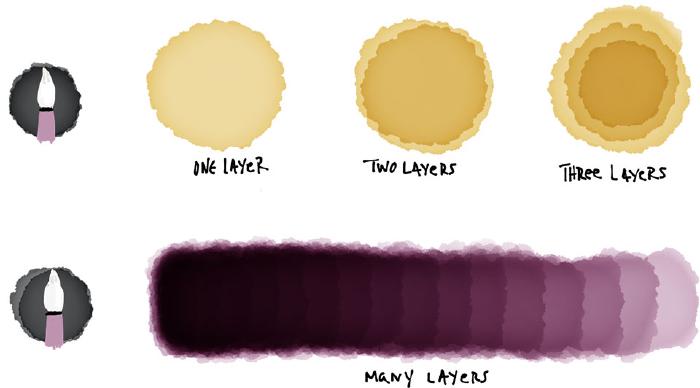
It helps to think of your stylus tip as a brush loaded with watered down paint. Because the paint has been thinned it won’t be as intense or saturated as the color from one of the pens. Instead you need to build up color in multiple layers.
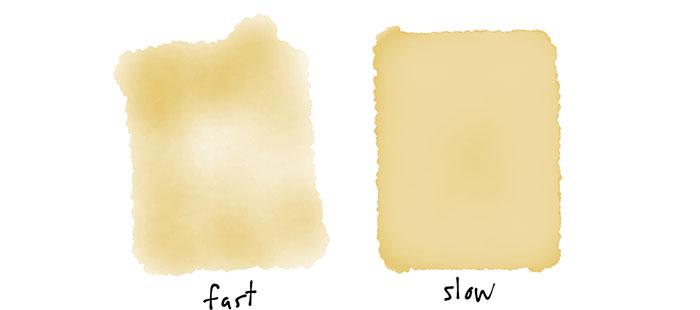
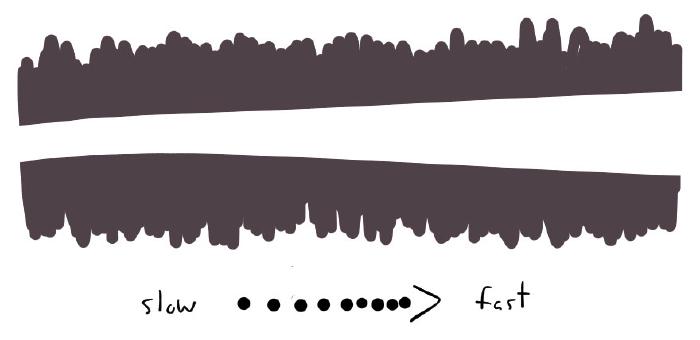
This “thinned out” behavior also factors into how even of a coat you can apply. Moving the brush faster doesn’t let the paint fully cover a spot and will make it appear choppy. While moving slowly allows the paint to flow evenly off the brush and build into a dark even value. Mastering the speed at which you apply color is essential to creating even tones and shading.
It may be helpful to create a few color scales with the primary colors, gray, and black to practice. Below are watercolor tests I created for myself after FiftyThree updated Paper to include the Color Mixer tool.
Color Mixer
Before the Color Mixer existed, you had to get creative if you wanted a color other than the nine Paper shipped with. By mixing these colors directly on canvas you could make other colors. Some colors worked great with this technique while others turned to mud if too many layers were applied.
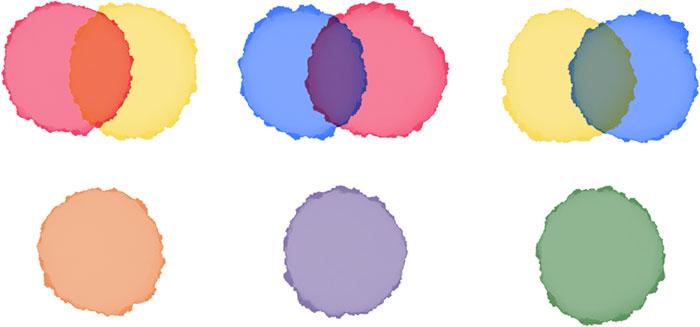
Color theory is a tricky dick — thankfully FiftyThree did something great with their Color Mixer. Mixing together any color will almost always make a new one that looks great.
For those who need more control or want a traditional color picker — one can be accessed by dragging a color swatch onto the mixing wheel, then tapping on it. From here you can adjust a color’s hue, saturation, and brightness (luminosity).
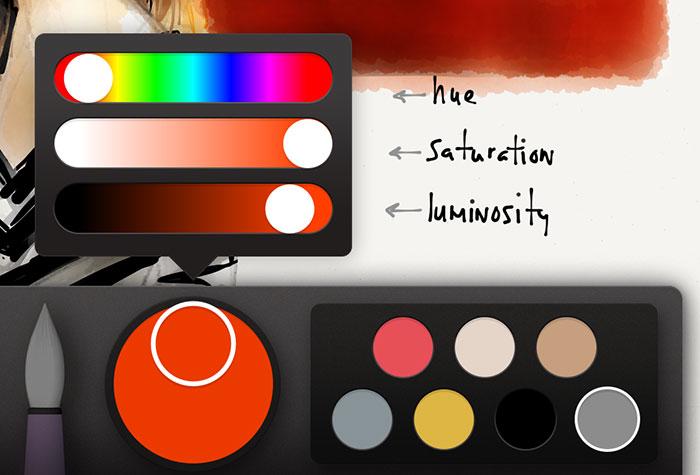
For a good shadow color, I adjust the base color I’m shading with by cranking the saturation down and the brightness up.
Gestures to master
If you only learn two gestures when using Paper, make them Rewind and Zoom.
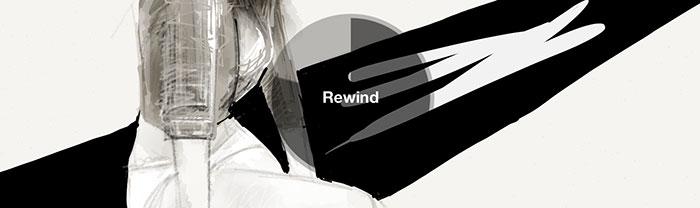
Rewind
I’m going to let you in on a little secret. The first couple of months I used Paper by 53, I hated the Rewind feature because I couldn’t use it consistently. It pissed me off so much, that I gave up and used the eraser instead. I would have killed for a software button that triggered an undo back then…
I eventually came to my senses and gave it another go by forcing myself to use Rewind exclusively. After a few drawings I mastered it and was time traveling back through my boo boos with ease.
It’s entirely possible that FiftyThree tweaked Rewind behind the scenes to make it easier to use, but I like to think it was my perseverance that made the difference.
Stick with it if you’re having trouble, I promise it will eventually come naturally. And if it doesn’t, you can always purchase a Pogo Connect Smart Pen and map the button to undo. To correct simple one step mistakes the undo button works great, for anything else I prefer the rewind gesture to avoid pressing the button a million times.
Zoom
The single most requested feature by fans and haters of Paper… Zoom. I’ve drawn a hundreds portraits fine without zoom, but boy was I happy when FiftyThree finally added the feature.
That said I did cheat a bit by using an accessibility feature in iOS4 that lets you magnify the screen by tapping with 3 fingers. Not a true zoom, but it does have its place when you need to magnify an area — the tools don’t scale so it isn’t that useful if you’re trying to vary line widths.

There isn’t much else to Zoom — I’m merely mentioning it to increase awareness around it. Unlike other drawing and painting apps with zoom, the entire canvas doesn’t scale. Instead you control the area you want magnified by you opening a circular portal loupe that can be moved around or dismissed by tapping outside of it.
Well there you have it. I hope this has served as a good introduction to Paper by 53, how to use the tools, the gestures, and a taste of what is possible with the app.
Not transparent or translucent; impenetrable to light; not allowing light to pass through. ↩︎
I define pure as matching the color selected in the mixer. Many of the tools have a hint of translucency to them and need 2–3 layers to match exactly. ↩︎
I suppose I could break the creative flow and switch to a traditional capacitive stylus for lettering if I wanted to continue using the fountain pen. Nah… ↩︎
The iPad has a system wide zoom feature that allows you to enlarge the screen by 3 finger tapping it. To activate, go to Settings > General. Tap on Accessibility and then turn on Zoom. ↩︎
Made Mistakes is a participant in the Amazon Services LLC Associates Program, an affiliate advertising program designed to provide a means to earn fees when linking to Amazon.com and affiliated sites. For full details read the complete disclosure policy.
58 comments
This writeup is AMAZING, thank you for teaching me all the tricks of this amazing app!
Great guide! :D
is there any difference if one is drawing on retina or non retina display i mean do we have more details on retina ipad ?
Detail is probably about the same while drawing, but on export a retina iPad gives you a file that is twice as large. Which is an advantage if you’re trying to make prints.
Great article! I’m new to paper so this was very helpful, Very clear and to the point. I love how you don’t completely praise the app but simply mention its good features while still giving its limitations. :)
thanks :) it means i dont have to upgrade to ipad retina :)
I love the watercolor brush but am also interested in using a bamboo tablet for drawing. Does anyone know of any mac software that is as nice as paper for watercolor?
I wish I could get get the brushes in Photoshop to react like Paper’s watercolor. It’s the number one reason I keep going back to the app. It may not have all the bells and whistles as pro apps, but their watercolor is so damn nice.
That said, have you tried Tayasui Sketches? They have a Universal iOS app as well as a macOS app that are very similar to Paper by FiftyThree.
Thank you for taking the time to share this, now I feel a little less lost!
Very useful, and I like it.
Being new to paper I found this info most helpful thank you!
I tried this yesterday. It’s very fine but how can I change the Brush size?
Unfortunately you can’t change the brush size. The best you can do is manipulate the width of the fountain pen depending on how fast you draw a stroke. Or you can buy a Pogo Connect stylus and that lets you vary brush size depending on the amount of pressure you apply. Press light get a small stroke, press hard get a thicker one.
Thank you so much for sharing this series…I found it super helpful and I feel motivated to stick at working with Paper. I actually found it in depth and I got a greater understanding on how to use the app. So kudos to you good sir for this wonderful series."
My pleasure. I learn something new every time I use Paper. It’s such a fun app!
Being an artist, I’ve just about used every sketching, drawing, painting, apps available out there in art heaven! There is nothing that comes close to Paper53! I think it is the simplicity of the app, and the ability to create high quality sketches and paintings! I’m using it for my art journal this year. I am using an adonit stylus…it works great! Love, love, love this app!
Do you have any tips for perfecting rewind?
Use two fingers, and move it in a circular motion. Not too fast and not too slow. Just stick with it and you’ll eventually learn how to trigger it 100% of the time.
And if you’re really having problems using it, you can always buy a Pogo Connect if you have a 3rd/4th generation iPad. There’s a button on the stylus that acts as an undo in Paper.
Like you, I used the heck out of this app for a very long time. I finally walked away when I realized that they would never add an undo button option. Without it, the app is frustrating for me and many users. I have a physical disability that causes problems with my hands. Some users simply don’t like the rewind feature.
Regardless, the company knows it is an accessibility issue for some and have refused to accommodate by simply providing the option of an undo button for users who cannot use rewind for one reason or another. I wish Apple would require art apps to include this important feature, but I honestly don’t think they should have to require it – developers should want their apps to be accessible.
It’s too bad because this really is an innovative app that encourages people from all walks of life to be more creative. Adding an undo button option wouldn’t threaten ‘rewind’ (a similar app added it as an option, leaving their gesture-based undo as default). It would, however, require the development team to be less arrogant. Not holding my breath.
Have you tried playing with the AssistiveTouch options in the iPad’s Settings app? You can assign favorites to any gesture you want. In theory you would make one for Rewind and then you can activate it anytime you want.
It’ll take an extra tap to do it, but it’s an option until FiftyThree adds it natively to the app.
Another option, albeit expensive is to purchase a Pogo Connect stylus. It has a dedicated undo button on the pen that you can click to activate Rewind. That’s how I do it since it’s much quicker for small undos.
Thank you for sharing your knowledge of Paper 53. I’m new to the app and already like what I see!!!
Okay, so this is a rank beginner asking, but I cannot find out how to control (ie, access and use) Rewind. It pops up sporadically in the middle of the page but I can’t seem to choose it even then. And how do I get to it when I want it?
Oh, and Zoom is the same thing–HOW do I get to it? Sorry, but this has been a real trial, and I do feel like I have some basic familiarity with apps like this.
(I am using Paper with the Pencil stylus, but am having problems with Rewind and Zoom both with my fingers and Pencil.)
Thanks for help with this; can’t seem to find any of this REALLY basic stuff on any of the Paper Fifty Three pages
Rewind and Zoom are both gesture based (meaning you need to use your fingers in specific motions). I would suggest watching the built in tutorial videos Paper comes with to see how they’re done. If you tap the 53 circle in the upper right corner you can get at them.
Or you can scroll down a few comments, I provided a link to FiftyThree’s support forum where they have videos of all the gestures and tips for doing them.
Rewind can be tricky to master at first. The basic idea is you use two fingers and swipe them in a circular motion.Counter clockwise rewinds a mistake, and clockwise goes forward if you rewind too far.
Zoom works almost the same as pinching in the Photos app. Just take your two fingers and pinch outward. You should see a magnifying glass appear that you can re-position by dragging it at the circle’s edge."
Love the app - and I wanted to thank you for taking the time and using your skills to share your knowledge and experience with us. Your guides and tutorials have helped enormously. Many thanks!
Michael, being new to Paper 53, I am finding it difficult to retrieve my tool/palette while doing my drawing/painting. Can you give me some direction please?
If you swipe up from the bottom of the screen it should bring the tool palette back.
Thanks so much for this extremely useful lesson. Very helpful indeed.
I’m learning also, i find useful to zoom by spreading two fingers in a blank area (in case i miss) i can erase, and drag the zoom by the edge line. You see a faint version with a center dot for accurate positioning as u drag.
How Can i save It and email a drawing
You’ll find more information on how to share on FiftyThree’s support site.
The rewind feature is the worst. Why do I have to put down my pencil and go through a very unstable process only to find that half the time it does not work. AND…every time it doesn’t work, which is often, I end up with unwanted smudges an/or circular lines on my drawing. Fifty Three’s refusal to acknowledge this problem only complicates the issue. Their own website has closed down comments in their own forum regarding all things relating to UNDO/Rewind. That says a lot.
Probably not the answer you want to hear but if you want to spend the money on an expensive Bluetooth stylus give the Pogo Connect a try. It is the only stylus I know of that has a dedicated undo button supported by Paper.
I do know where you’re coming from. I absolutely hated the Rewind gesture when I first used Paper. Once I got over trying to second guess it and follow through with the gesture it started working better for me. A few years later and I have almost no problem using it now.
The speed at which you make the circular gesture and the amount of fingers you use makes a big difference. Sometimes you’ll notice it drawing on screen instead of undoing, but if you continue with the motion it fixes itself. The Blend feature works that way too.
There appears to be some sort of auto-correct going on in the software that tries to fix mistakes, but it only figures that out after the fact. Learning to trust that it will do the right thing can help."
Great great article..! Michael, is there a way to save a color shade you mixed in palette for future use? I am novice in painting, not sure of remembering numbers associated to colors. Thanks again
There is! Once you have the color mixed the way you want, tap and hold on the small circle inside of the larger one and then drag it into a palette slot over in the lower right corner of the tool tray. If you drop it on top of an existing color it will replace it so be careful of that.
You can also rearrange the colors by tap and holding on them and if you screw up the default colors you can go into Paper’s settings and reset them.
Another option if you fill up all your palette slots with colors is to make some swatches on your drawings. I sometimes do that by coloring a circle over to the side of the canvas and then use the Color Picker tool to sample it when needed. If you haven’t used the picker yet and want some pointers I wrote an article about it.
I’m glad I found your site. Makes me wanna go back to Paper and Pencil again.
Michael: Just opened paper yesterday after non use for a while. My tool tray no longer shows the various pens/ markers, just a pen with a ruler underneath. What happened? Thank you.
Those are the new Think Kit tools. Just swipe left on them to get at the other tools (marker, pens, pencil, etc.)
Thanks a lot Michael.!! I started reading your tutorials in order. Now i am getting all tips and tricks. I love drawing and painting but couldn’t get a direction. The tutorial on drawing trees itself gave me the right start.!!! It would be great to get comments/advice on my drawing…!!
I just downloaded the app and some of the features I was looking forward to using are not there (notebooks, zoom bubble). Is the generation iPad I am using? It says it works with 3rd generation which is what I have. Love the app even without the features that are missing.
It’s not your iPad, its Paper. They had a really big update a few months ago and much of the UI changed or was refreshed. Zoom loupe was removed in favor of zooming the entire screen. Notebooks are now stacks of ideas. Etc etc etc.
I can’t seem to find a way to change the drawing ‘width’ of a tool to get a precise width.
Width isn’t controlled or set in a conventional sense. The speed at which you draw allows you to vary it. Each tool is slightly different in how speed affects it.
So there is no way change width and opacity as in other apps like ProCreate?
I have a Pencil 53 and having a hard time figuring that out for painting.
Nope nothing like Procreate where you can manually set the width. Width is more organic with Paper. When you want a fatter stroke you use the long side of Pencil’s tip. When you want a thin stroke you use the tip.
Hi Michael - received “Paper"as a Christmas present. Today your site was emailed to me. Wonderful. Thankful for the gift and for your gift of so useful a guide.
Hi Michael, thank you so much for that masterpiece you created here! Helped a lot!
Still I have one question: is there any way of “resizing” objects? I mean you can obviously cut out parts and move them but is there a way of changing their size?
Thank you so much!
As far as I know of, no. You can just reposition objects you’ve cut out using the scissors.
Seems like a feature that would beer nice to have though. Procreate for example let’s you resize, rotate, and reposition selections.
How i can set canvas size? Because i want to designed with 120cm of square. I will be print in that measurement.
You can’t change the canvas size in Paper. You’ll have to use a different app after the fact, that can resize/crop your image.
If you want more control over the canvas size you might want to look at Procreate.